2016-04-22

The Versys fork seals are leaking

It never rains, it pours. Or so it seems here at home. I've made a hash of my XR400 Carburetor repair, yesterday I blew a brake line on my venerable old 2003 Honda Civic, and today while riding my bike, I blew a front left fork seal. :'(


You will be happy to know that I found a fix that cost me ten dollars and hours of labour. Seal Mate saves the day!


I wonder if this is all just dirt under the seals and if I can use the "seal mate" trick with a piece of old 35mm film or negative?

Motion Pro Seal Mate


If you are thinking about buying a Seal Mate, and you live in Canada, you may want to do so here:

http://sealmate.net/seal_mate_instructions.html

I've had some experience replacing fork seals on a Kawasaki KLR 650, but the Versys uses the inverted upside down fork configuration, and my research shows that the job is just as messy, and requires some specialized tools to service the fork that I simply don't have at the moment. So lining up for this job, I find I need the following bits based on servicing both front forks as opposed to only one:

  • SEAL,DUST (Ref # 92093)           92093-0035      2 Each 
  • SEAL-OIL (Ref # 92049)              92049-0058       2 Each
Fork Oil:


Specialized tools:
  • Fork Spring Compressor tool
  • Fork Bleed tool
  • "Finger" plate
Fork Spring Compressor Kit for inverted forks
These are from Traxxion Dynamics and if you find cheap Chinese knock offs that look very similar, the word on the street is be very careful, as they tend to break more than they work as compared to this Made in USA model. 


I found a comprehensive video that shows service on similar forks to the Versys, but this is not exactly the same as out bike. Please let me know if you have a better source for this. 

Part 1


Part 2


eBay sourced tool that does not get good reviews. Buyer Beware:
The price is right, but is it worth it?


This is a real DIY approach.


That's all for now.

I did manage to get them sorted out using Seal Mate, and got another season out of them! https://www.ridereports.ca/2016/05/leaking-fork-seals-solved.html

2016-04-21

The Versys Gen 1 mirrors...

I've a 2009 Kawasaki KLE650 Versys, known as a Gen 1 as it was the birth of the new model back in 2007, and they had a few bugs that needed to be ironed out, which included "loose mirrors". Which will become "useless" mirrors etc.

Note the missing left hand side mirror?

Some of the bugs really irked me. Such as loose mirrors. I suppose if you fell into that rider category of "Only rides from Church to Tim Horton's when the forest fire danger is 'high to extreme'." then you know nothing of my dilemma and wonder why I need to replace my mirrors on the bike. I fall into the "He probably shouldn't be doing that. He might fall down or damage the bike. Oh my! He did fall down and damage the bike!" category of rider.

After many gravel roads and potholes, wheelies etc, I found that my left hand mirror began to move more easily. I'd hit a really bad pothole, or come down too heavy on the front end, and it would swing around backwards at me. A casual glance at these mirrors leads you to think that they are really strong and robust...

That rubber covers a multitude of sins...
The mirror shaft is about 12mm in diameter, and uses a 10mm threaded bolt to mount to the handle bar brackets, yet the designers of this have cleverly camouflaged their mistakes under a couple of layers. 

First you will need to slide the rubber cover up to expose a curious sight, 

I bet you don't have a wrench this big in the set you bought on sale...

So why would you use a nut that ships with PRE-ROUNDED corners much larger than the average 17mm or 19mm wrench that ships with an average combination wrench set?! Right, so if you are like me, or my friend WIllie, out comes the trusty old adjustable wrench and you are able to find that in order to tighten the mirror, you need to separate these two. The Silver Cone (Part A) needs to be removed from the Black Base (Part B), then using a thin walled 10mm socket, you need to tighten a nylock nut on the end of the mirror that uses friction to hold the mirror in place. You do this by hand without the aid of a vice, and think you might want to use some of the blue medium strength thread locker on all the parts so you won't be back into this on Friday after work. Note that I would not be able to do this roadside with the stock kit as it lacks the tools necessary. 

2014 saw me tighten the mirror too much with the nylock nut, and I managed to snap off the end of the mirror, but by the grace of God there was enough thread left behind that I was able to reuse the nut with some washers, and get through the rest of the season.

Fast forward to 2015, and now the left hand mirror is wobbling when I'm on rough pavement, so I'm constantly correcting it before lane changes. I'm now much safer as any to the left has to be cleared with the mirror and a should check first, as the mirror is often no longer showing a view to the side and rear of the bike. A last ditch attempt to fill Part A (The Silver Cone of Concealment) with JB Weld epoxy, tighten the bugger and let that goop set for 24 hours, saw me once again snap the end of the mirror off, but this time it was done, and I rode the last couple of weeks of the season without a left hand mirror.
It's dead, Jim!

I happily forgot all about it until a few weeks ago when I took the bike out, after which this starving student ordered in the cheapest replacement pair I could find that would pass a vehicle inspection coming up in July when I renew the registration. China had the answer, and I got my package...

Julie Andrews and the Sound of Music - Brown paper packages tied up with string... These are a few of my favourite things...
Are you old enough to even remember that song? :D


 I was a bit nervous that the mirrors would mount properly as while I researched, I heard mention of left and right handed threads etc., but I'm happy to report on my Generation 1 Versys, the thread is 10mm on both sides, and the normal right handed thread we all know and love. Righty Tighty, Lefty Loosey.
They aren't made of cheese, but they are pretty cheesy. 
 These mirrors are made of cast white metal, and frankly I don't think they will last more than a couple of years, but for $37 Cdn shipped, I can live with that. I want something functional that will pass an MVI later this year.

I still can't believe how robust the upper is compared to the final 8mm connection.

Who came up with this and couldn't see a problem developing later on?


Not perfect, but they work.


Job done, time to blog, err, Ride!
And that is that, although I do have a couple of suggestions for the designers...

  • If you have a 12mm shaft, try to stick to within a couple mm of the connecting bolt. Just saying.
  • Nylock nuts on a mirror? Come on. If you can't even touch that the nut with the bike onboard tools, then it needs to be rethought. 
  • Next time I'd rather you focus on vibration damping if you are going to invent something fancy and useless
  • Run any designs past your old man first and get his go-ahead before sneaking them onto  the completed project. If you cannot find an old man, one will be provided for you. 


I'll come back and update this if they survive... :D

Update: 2016-04-22

 The mirrors are pointing at the ground and have horrible vertical adjustment. I'm going to have to rotate the mount on the bars in order to get a better view of the road behind. That may effect the attitude of the brake and clutch levers. Perhaps I'll simply loosen the handle bar and rotate that until fixed? 

Update 2022-04-19:

As bad as they are, these thirty seven dollar mirrors are still in one piece and working. One vibrates and buzzes once in a while like an angry bee until I reach over and jab it into silence with my thumb. More powder coat paint has flecked off, but they are working, and I've no plans to replace them until they fail. :)

2016-04-14

DIY 'Ultrasonic-ish' parts washer

I got through much of my life without needing a dedicated parts washer, until I found that the old planet destroying carb cleaners that actually worked were no longer to be found, so using ineffective spray on cleaners just made me spend more money and time.

How do I get that carburetor cleaned up so it runs properly? Several of my friends suggested I repeat the "soak".

Here are a couple of redneck takes on parts washers that I think are absolutely brilliant! The first offering requires no special mods and I think using a 5 gallon pail might just do the trick. :)


And of course, Ichiban Moto:


2001 Honda XR400 Carburetor woes...

If you recall, when I purchased the Honda XR400 from Willie, it had been sitting in a barn in Ontario for some time. A bit longer than I care to recall in fact, and certainly long enough for some problems to occur that I hadn't counted on.


  • The fuel really couldn't be called "fuel" any longer, but could be described as "varnish" and "gum", especially in the carburetor. 
  • The float needle valve was firmly glued into it's seat and wouldn't move at all. 
  • The float needle valve spring was weak and wouldn't hold the valve closed under normal gravity pressure. 
  • The OEM Honda fuel petcock's plastic fuel filter/screen in the Clarke tank had deteriorated and was in pieces at the bottom of the tank lying in the crud (see above) 
The carb float bowl, bottom half
I had to use about 80lbs psi of shop air to blow out that float needle valve, and then clean up the seat so the new valve would have enough slip to work properly.


Those floats need to be checked for buoyancy and adjusted to a min max height 

Dirt in the fuel or the fuel turned to dirt. *sigh*

KVN-19S30 Aftermarket replacement float needle
 Anyhow, I thought I cleaned all of that out and installed the new float needle valve properly, but after reassembly it is still pissing fuel everywhere. 

I'm going to have it off again and focus on debris above the float needle this time. I'll install an inline fuel filter between the petcock and the inlet to prevent it happening in the future, and give the carb a really good going over to see if I have it sorted. Then it's off to a professional if I can't get this garbage fixed. :'(

I think I need to rehab the fuel petcock as well:

http://www.thumpertalk.com/topic/819530-petcock-repair/


Some resources I found helpful are here:


http://www.thumpertalk.com/topic/1109089-xr400-carburettor-pouring-fuel-out-of-the-air-ventdrain-tubes/

http://gregthebricoleur.blogspot.ca/2013/05/honda-xr400-carburetor-float-fix.html

http://www.thumpertalk.com/topic/806446-need-help-xr400-puts-gas-a-over-the-floor/

http://www.allthingsmoto.com/forums/f-19/2000-xr400-carb-problems-62990/

Something to help you see it all "(18) Float Valve" is what I replaced


Here is the culprit after marking it's spot. It reminds me of a dog marking it's territory.
That my friends, is a PITA

The bike marks it's spot


Wish me luck!

And it LIVES again!!!

2016-04-10

2016 The springtime North Rustico ride

I will admit that I woke up quite late this morning, but a glance out of the kitchen window showed a bright sun shining down on a lawn recovering from winter hibernation, and the thermometer said it was 9 degrees, so I assembled my gear, located my boots that magically had disappeared, and headed out to the garage to fire up the Versys and head out for a short afternoon ride in the sun.

On the beach at North Rustico Harbour
 It was a great start to the season, and I'm looking forward to the next outing.

Kelly's Cross to Borden-Carleton to North Rustico Harbour and home.

Winter makes it's mark on the landscape


The snow is almost gone


2016-04-07

2016 You would think that Spring had arrived or something

Let's sneak a peek inside and see what is up
When I last left the garage, we had successfully pinched a brand new inner tube for the rear tire of the Yamaha 125. Argh! I've done a lot of tires, but this was akin to working on a stiff walled front tire rather than the rear tire of the Yamaha. You will remember I've worked on KLR and DR650, more so than small cc dirt bikes.

They got a tube, fired it up after a long bout of kicking then pushing until it they got it running. We heard then saw my nephew Tyler riding circles round the house on the 125, so my sister Wendy-Sue and I, our curiosity peaked, headed into the garage to see the normally calm world gone mad with spring motorcycle fever.


They gather round the new Triumph Scrambler.

I can't get enough of this exhaust note. 

My turn...

Tyler moves up from the 125...

It looks better from this angle...

Triumph


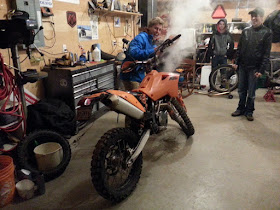
The concept here is that Nathan is trying to recharge his battery by idling his bike in the garage.


Chicken strips on my new rear tire... PEI style

She's mine, all the bits hither and yon, they are mine. 

If I had my 450 running...

Logan will be here to pick up his DR400SM any day now. He keeps it mint. 


Here is the power plant, all put back together after he grenaded the engine. 

It's just waiting for an oil filter now, before the long awaited fire up. 

In the meantime, it seems that Nathan is letting off some steam. 

I think you might want to hook that battery to a charger after all


And here sits Wendy's bike, the Bonneville, all ready to go. 
At this rate I might have to get a Triumph Tiger if I want to blend in. :P